Build your free Excel customer list in an hour.
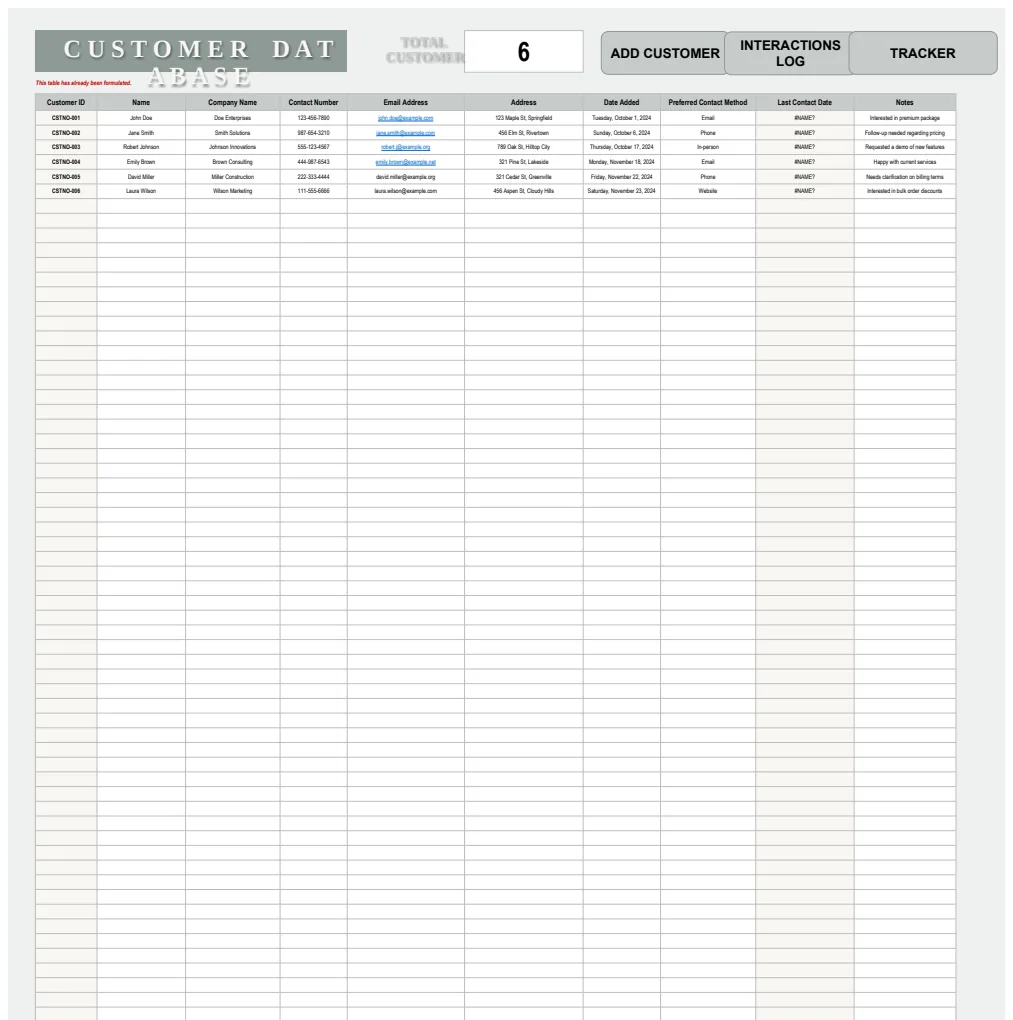
Discover how to create a robust, free customer database in Excel within an hour, focusing on essential structure and key data points.
Many people assume a robust customer database template Excel free means something basic, perhaps a simple list. In reality, you can build a surprisingly powerful system with just a few key columns and formulas, even without specialized software. The core of any good customer database, whether free or paid, is organized data that lets you quickly find information and understand your customer base.
Getting started with a customer database template Excel free is more about structure than fancy features. You need distinct fields for contact information, purchase history, and perhaps communication logs. This allows for effective follow-up and personalized outreach.
Essential Columns for Your Customer Database
When setting up your spreadsheet, think about what information you actually need to track. Too many columns can become overwhelming, while too few will limit your ability to leverage the data. Here's a solid starting point for most small businesses:
- Customer ID: A unique identifier for each customer. This is crucial for linking data across different sheets or for more advanced tracking. You can simply number them sequentially (e.g., CUST001, CUST002).
- Company Name: If you're B2B, this is essential. For B2C, you might use this for family names or a primary contact's name.
- Contact Person: The name of the individual you typically interact with.
- Email Address: Your primary way to reach them digitally. Ensure this is formatted correctly.
- Phone Number: Direct line or main office number.
- Mailing Address: Street, City, State, Zip/Postal Code.
- Customer Since: The date they first became a customer. This helps identify long-term clients.
- Last Contact Date: When you last spoke or interacted with them. This is vital for follow-up.
- Last Purchase Date: The date of their most recent transaction.
- Total Spent: A running total of their purchases. This requires a bit of formula work, which we'll cover.
- Notes/Last Interaction Summary: A brief note about your last conversation, their needs, or any special requests.
- Customer Segment/Type: (Optional but Recommended) Categorize customers (e.g., "New," "Repeat," "VIP," "Prospect"). This allows for targeted marketing.
Setting Up Your Spreadsheet Structure
Open a blank Excel or Google Sheet. Rename the first sheet "Customers". You'll enter the column headers identified above in the first row. Each subsequent row will represent a single customer.
For the Customer ID, you can manually enter them or use a simple formula in cell A2 (assuming your headers are in row 1): = "CUST" & TEXT(ROW()-1, "000"). Drag this formula down to apply it to new rows. This will generate IDs like CUST001, CUST002, and so on.
The Customer Since and Last Purchase Date columns should be formatted as Dates. This makes sorting and filtering by date much easier. Select the columns, right-click, and choose "Format Cells" > "Date".
Calculating Total Spent
This is where a simple spreadsheet starts to feel like a CRM. You'll need another sheet for your sales transactions. Let's call it "Transactions".
In the "Transactions" sheet, you'll need columns like:
- Transaction ID: Unique ID for each sale.
- Customer ID: Crucially, this must match the Customer ID in your "Customers" sheet.
- Transaction Date: Date of the sale.
- Product/Service: What was sold.
- Amount: The value of the transaction.
Now, back in your "Customers" sheet, in the Total Spent column (let's say column J), you can use a SUMIFS formula. Assuming your Customer ID is in column A of the "Customers" sheet, and the Customer ID and Amount columns in the "Transactions" sheet are, say, columns B and E respectively, the formula in cell J2 would look like this:
=SUMIFS(Transactions!$E:$E, Transactions!$B:$B, A2)
This formula tells Excel: "Go to the 'Transactions' sheet, look at all the values in column E (Amount), and add them up only if the corresponding value in column B (Customer ID) matches the Customer ID in cell A2 of this row." Drag this formula down to apply it to all your customers.
Tracking Last Purchase Date Automatically
Similarly, you can automatically populate the Last Purchase Date in your "Customers" sheet. In cell I2 (assuming Last Purchase Date is column I and Customer ID is column A), use the MAXIFS function:
=MAXIFS(Transactions!$C:$C, Transactions!$B:$B, A2)
This finds the latest date in column C (Transaction Date) on the "Transactions" sheet where the Customer ID in column B matches the Customer ID in A2 of the "Customers" sheet.
Enhancing Your Database with Conditional Formatting
Conditional formatting can make your customer data visually actionable. For example, you can highlight customers who haven't been contacted recently.
- 01Select the
Last Contact Datecolumn (or the entire row for the customer). - 02Go to the "Conditional Formatting" menu.
- 03Choose "New Rule".
- 04Select "Use a formula to determine which cells to format".
- 05Enter a formula like:
=TODAY() - G2 > 90(assumingLast Contact Dateis column G, and you want to highlight if it's been over 90 days). - 06Set a fill color (e.g., light red) for the formatting.
This instantly shows you at a glance which customers might need a follow-up. You can apply similar rules for customers who haven't purchased recently or those with a high total spend.
Common Mistakes to Avoid
- Inconsistent Data Entry: Using different spellings for the same company name or variations in addresses will break your search and analysis capabilities. Establish clear data entry rules.
- Not Using Unique Identifiers: Relying solely on names is risky. People share names, and company names can change. A unique
Customer IDis essential for accurate data linking. - Overcomplicating the Sheet: Trying to cram too much into one spreadsheet can lead to errors and slow performance. Keep your primary customer list clean and use separate sheets for detailed transaction logs or interaction notes, linking them via the
Customer ID. - Forgetting to Update: A database is only useful if it's current. Schedule regular times to update customer information and transaction details.
Integrating with Other Tools
While a customer database template Excel free is a great starting point, you might find its limitations as your business grows. For instance, sending out invoices directly from your customer data can be a significant time-saver. Templates like the Service Invoice can be populated with customer details, reducing manual entry.
If you manage a higher volume of orders and need to link customer data directly to those transactions, the Order Forms for Small Business Template offers automated lookup functionality to pull customer information for each order.
For a more integrated approach, consider a dedicated CRM solution. However, for many small businesses, a well-structured Excel or Google Sheet can serve as an effective customer database template Excel free, providing essential insights and organizational power. You can find templates designed for these purposes, such as the Customer Database Excel Template, which offers pre-built fields for comprehensive customer relationship management.
How to Handle Duplicate Entries?
If you find duplicate customer entries, the first step is to identify them. You can use Excel's "Remove Duplicates" feature (under the Data tab), but be cautious. It's best to perform this after you've consolidated all data and established a primary record. For accurate consolidation, use the Customer ID to merge information. If one entry has a more complete address or a more recent contact date, use that data to update the other record before removing the duplicate.
Can I Import Existing Data?
Yes, most existing customer lists, often in CSV or other spreadsheet formats, can be imported. In Excel, go to "Data" > "Get Data" > "From File" > "From Text/CSV". In Google Sheets, go to "File" > "Import". Ensure your data is clean before importing, paying close attention to column headers and formatting.
What If I Need More Advanced Reporting?
For more sophisticated reporting and analysis, you might explore pivot tables in Excel or Google Sheets. Pivot tables can summarize your transaction data by customer segment, product, or time period, providing insights beyond simple sums. If your needs become very complex, you might eventually look into dedicated CRM software, but for many, a well-maintained spreadsheet is sufficient. The Invoice Manager Pro template offers a more advanced invoicing system that integrates customer data and sales tracking, which could be a next step.