A spreadsheet template for tracking class attendance
Discover how to create an effective class attendance tracker spreadsheet template to monitor student presence and participation easily.
The COUNTIF function is your best friend when setting up a class attendance tracker spreadsheet template. If you have a column for each day of the week, say Monday through Friday, and you want to quickly see how many students were present in a given week, you'd use something like =COUNTIF(C2:G2, "Present") where C2 is the Monday column and G2 is the Friday column for a specific student. This simple formula can save you hours of manual counting.
Most instructors find themselves needing a reliable way to monitor student participation. A well-structured class attendance tracker spreadsheet template not only helps you identify patterns in student presence but can also inform your teaching strategies. Tracking attendance consistently provides a clear, data-driven view of engagement, which is crucial for student success.
Setting Up Your Basic Attendance Sheet
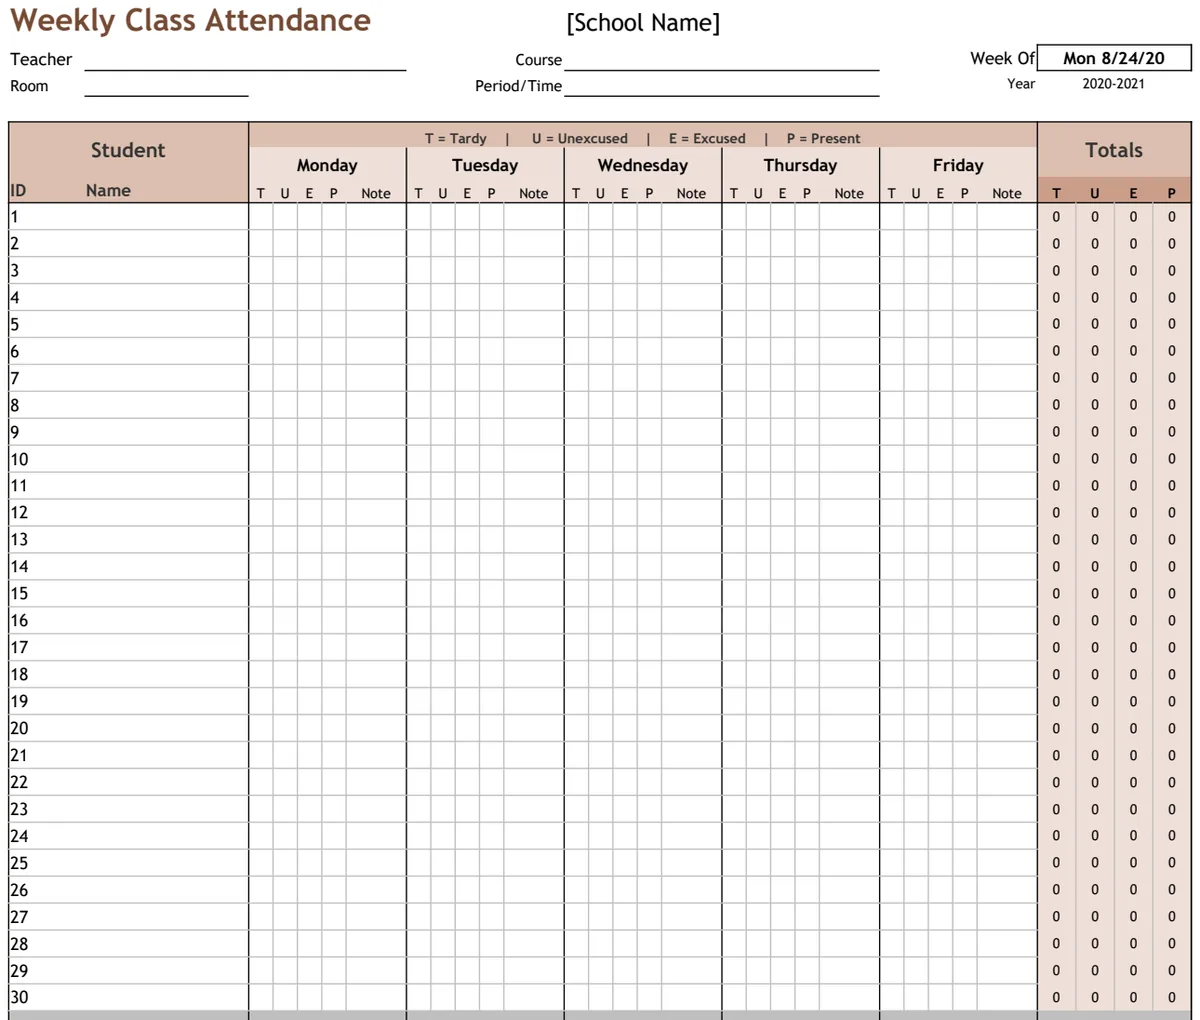
Start with a clear layout. Your first column should be for student names. Then, create columns for each day you hold class. For a typical Monday-to-Friday schedule, you'll have five distinct columns. You might add a Total Present column and an Absences column at the end to summarize each student's attendance for the week.
Consider how you'll mark attendance. Common entries include "Present," "Absent," "Late," or "Excused." Keeping these consistent is key for accurate calculations. For example, if you want to count "Late" as present, your formulas will need to account for that.
Here's a basic structure for your first few columns:
- Student Name: Full name of the student.
- Monday: Mark attendance for the first class day.
- Tuesday: Mark attendance for the second class day.
- Wednesday: Mark attendance for the third class day.
- Thursday: Mark attendance for the fourth class day.
- Friday: Mark attendance for the fifth class day.
- Total Present: A calculated field showing total days present.
- Absences: A calculated field showing total days absent.
Automating with Formulas
Beyond COUNTIF, you can use SUMIF or SUMIFS if you assign numerical values to attendance types (e.g., Present = 1, Absent = 0). For example, if you want to calculate the total days present, and you've used "P" for present and "A" for absent, you could use a formula like =COUNTIF(C2:G2, "P").
To calculate absences, it's a similar approach: =COUNTIF(C2:G2, "A"). If you want to tally both "Present" and "Late" as days a student showed up, you might need a slightly more complex formula, or you can adjust your input method. A common technique is to use a helper column or a more advanced formula.
Let's say your attendance data for a single student is in cells C2 through G2. To count only "Present" entries: =COUNTIF(C2:G2, "Present")
To count "Absent" entries: =COUNTIF(C2:G2, "Absent")
If you want to count both "Present" and "Late" as days attended, you could use: =SUM(COUNTIF(C2:G2, {"Present", "Late"})) This formula array counts both occurrences.
Handling Different Attendance Scenarios
What if you need to track attendance over a month? Or multiple classes? You'll want to adapt your template. For longer periods, you'll add more date-based columns. A monthly tracker would need columns for each day of the month, which can become unwieldy quickly. This is where templates designed for monthly tracking become very useful. For instance, a Monthly Class Attendance Tracker can pre-configure these columns and summary calculations for you.
If you teach multiple sections of the same course, you might want a separate sheet for each section or a way to filter your data. You could add a "Class Section" column and use filtering tools in Excel or Google Sheets.
Enhancing Your Tracker with Conditional Formatting
Conditional formatting can make your attendance data pop. Highlight cells where students are marked "Absent" in red, or "Late" in yellow. This visual cue helps you quickly spot students who might need extra attention or intervention.
To set this up:
- 01Select the range of cells containing your attendance marks (e.g.,
C2:G20for student attendance from Monday to Friday for 19 students). - 02Go to the "Conditional Formatting" menu in Excel or Google Sheets.
- 03Choose "New Rule" or "Add rule."
- 04Select "Format only cells that contain."
- 05Set the condition to "Cell Value" | "is equal to" |
"Absent". - 06Choose a fill color, such as a light red.
- 07Repeat this process for "Late" with a different color, like yellow.
This makes it easy to scan your attendance sheet and see potential issues at a glance.
Practical Mistakes to Avoid
One common mistake is inconsistent data entry. If one instructor marks a student as "Absent" and another as "A," your formulas will not count them correctly. Standardizing your attendance codes is crucial.
Another pitfall is not accounting for holidays or school breaks. If you simply leave these days blank, your absence count might be inflated. You can either manually mark these days with a specific code like "Holiday" or use a formula that excludes these dates from the total possible attendance days.
Forgetting to update formulas when you add or remove students is also an issue. If you add a new student in row 21, make sure your summary formulas (like Total Present and Absences) extend down to row 21. Using structured tables in Excel can often handle this automatically.
Advanced Features and Template Options
For more complex needs, consider templates that offer more robust features. If you manage many classes or need to track attendance over longer periods, a Weekly Class Attendance Tracker can provide a solid foundation. These templates often include pre-built summaries, charts, and even options for tracking excused absences separately.
Some advanced templates might also incorporate features like:
- Student ID fields: For easier integration with other school systems.
- Drop-down menus: To ensure consistent data entry for attendance codes.
- Automatic calculation of attendance percentage: Helping you quickly see a student's overall attendance rate.
- Roll call reports: Summarizing attendance for a specific class period or day.
If you're looking for a pre-built solution that handles these complexities, exploring a library of templates can be highly efficient. Many offer unlimited downloads for a one-time fee, providing access to a variety of tools for different tracking needs.
What if a student is marked "Late"?
If you need to track "Late" arrivals, you have a few options. You can treat "Late" as a distinct category and have a separate count for it, or you can decide whether to count "Late" as "Present" for reporting purposes. If you want to count "Late" as present, adjust your "Total Present" formula to include it, as shown in the SUM(COUNTIF(...)) example earlier. For example, =COUNTIF(C2:G2, "Present") + COUNTIF(C2:G2, "Late").
How do I handle excused absences?
Excused absences should ideally be tracked separately from unexcused absences to avoid penalizing students unfairly. You can add another column specifically for "Excused Absences" and use a similar COUNTIF formula: =COUNTIF(C2:G2, "Excused"). Alternatively, you can use a single code like "EA" and then adjust your summary formulas to distinguish between "Absent" and "Excused Absent" if your reporting needs require it.
Can I track attendance for multiple classes in one sheet?
Yes, you can. The most straightforward way is to add a "Class Name" or "Course" column at the beginning of your sheet. Then, you can use Excel's or Google Sheets' built-in filtering tools to display attendance data for only one class at a time. For more automated separation, you might consider using a separate sheet for each class, or a template specifically designed for multi-class tracking.