An Excel template for tracking your incoming payments
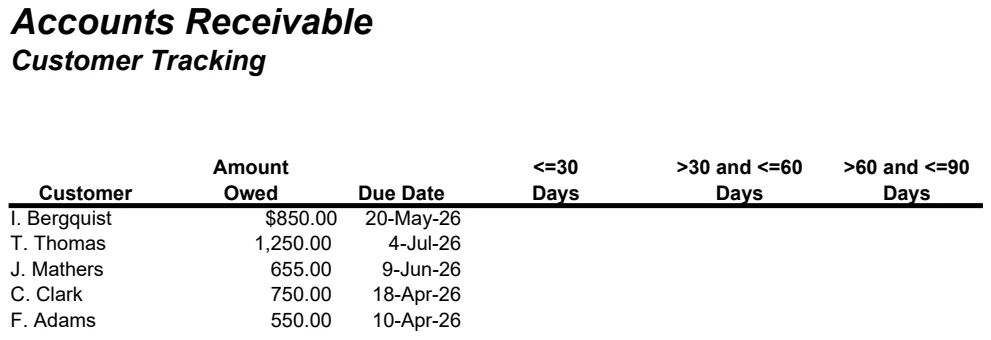
An accounts receivable tracker template in Excel can provide the structure and clarity needed to manage your incoming payments effectively.
The moment you realize you can't immediately tell who owes you money and for how long is the moment your cash flow starts to feel uncertain. This often happens when a simple ledger or a single spreadsheet cell tracking payments becomes insufficient, leading to missed follow-ups and delayed collections. An accounts receivable tracker template Excel can be your solution, providing structure and clarity.
You're likely here because your current method for tracking invoices and payments is no longer cutting it. Whether you're a freelancer juggling a few clients or a small business with an expanding customer base, knowing precisely who owes you what, and when it's due, is fundamental to healthy finances. This is where a dedicated accounts receivable tracker template Excel becomes invaluable, offering a systematic way to manage your outstanding invoices.
The Core Components of an AR Tracker
At its heart, an accounts receivable tracker needs to capture key information for each invoice. Think of it as your central hub for all money owed to you by customers. The absolute minimum columns you should include are:
- Invoice Number: A unique identifier for each invoice.
- Invoice Date: The date the invoice was issued.
- Customer Name: Who issued the payment.
- Description/Item: What the invoice is for (e.g., "Consulting Services," "Product X - Qty 5").
- Due Date: When payment is expected.
- Invoice Amount: The total amount of the invoice.
- Amount Paid: How much has been received.
- Balance Due: The remaining amount outstanding.
- Status: (e.g., "Open," "Paid," "Overdue," "Partially Paid").
- Date Paid: The date the payment was actually received.
Beyond these essentials, you might add columns for payment terms (e.g., "Net 30"), notes for follow-up actions, or even a link to the original invoice PDF.
Setting Up Your Tracker: A Step-by-Step Walkthrough
Let's build a basic tracker. Imagine you're using Excel.
- 01Create a New Workbook: Open Excel and create a blank workbook.
- 02Name Your Sheet: Double-click the "Sheet1" tab at the bottom and rename it "AR Tracker."
- 03Add Column Headers: In the first row (Row 1), enter the column headers listed above. For example:
- Cell A1: Invoice Number
- Cell B1: Invoice Date
- Cell C1: Customer Name
- Cell D1: Description
- Cell E1: Due Date
- Cell F1: Invoice Amount
- Cell G1: Amount Paid
- Cell H1: Balance Due
- Cell I1: Status
- Cell J1: Date Paid
- 04Format Dates: Select columns B (Invoice Date), E (Due Date), and J (Date Paid). Right-click and choose "Format Cells." Select "Date" from the Number tab and pick a format you like (e.g., "3/14/2012" or "14-Mar-12").
- 05Format Currency: Select columns F (Invoice Amount), G (Amount Paid), and H (Balance Due). Right-click and choose "Format Cells." Select "Currency" and choose your desired symbol (e.g., "$").
- 06Enter Your First Invoice: Let's say you issued Invoice #INV-001 on March 1, 2026, to "Acme Corp" for "Website Design Services." It's due on March 31, 2026, and the amount is $2,500.
- A2: INV-001
- B2: 3/1/2026
- C2: Acme Corp
- D2: Website Design Services
- E2: 3/31/2026
- F2: 2500
- G2: 0 (initially, as nothing has been paid)
- H2: =F2-G2 (this formula calculates the balance due)
- I2: Open (or "Overdue" if today's date is past the due date)
- J2: (Leave blank for now)
- 07Repeat for All Invoices: Add each of your outstanding invoices using the same method.
Automating with Formulas
The real power comes from formulas. The Balance Due formula is crucial. In cell H2, you'd enter =F2-G2. Then, you can drag the fill handle (the small square at the bottom-right of the cell) down to apply this formula to all rows.
For the Status column (Column I), you can use an IF statement to automatically update it. In cell I2, you could enter a formula like this:
=IF(G2>=F2, "Paid", IF(TODAY()>E2, "Overdue", "Open"))
This formula checks:
- If
Amount Paid(G2) is greater than or equal toInvoice Amount(F2), it's "Paid." - If not paid, it checks if today's date (
TODAY()) is past theDue Date(E2). If so, it's "Overdue." - Otherwise, it remains "Open."
You'll need to adjust this based on whether you want to flag "Partially Paid" invoices. For that, a slightly more complex formula or a helper column might be needed.
Prioritizing Collections with Aging Buckets
Simply knowing an invoice is overdue isn't enough. You need to know how overdue. This is where aging buckets come in, categorizing invoices by how long they've been outstanding. Common buckets are:
- Current: Not yet due.
- 1-30 Days Past Due: Recently missed.
- 31-60 Days Past Due: Getting older.
- 61-90 Days Past Due: Requires serious attention.
- 90+ Days Past Due: High risk of being uncollectible.
You can create these buckets by adding new columns to your tracker or by using a separate summary sheet. For example, in a summary area, you could have:
- Column K (Bucket): "1-30 Days Past Due"
- Column L (Count):
=COUNTIFS('AR Tracker'!I:I, "Overdue", 'AR Tracker'!E:E, ">="&TODAY()-30, 'AR Tracker'!E:E, "<="&TODAY()-1) - Column M (Total Amount):
=SUMIFS('AR Tracker'!H:H, 'AR Tracker'!I:I, "Overdue", 'AR Tracker'!E:E, ">="&TODAY()-30, 'AR Tracker'!E:E, "<="&TODAY()-1)
You'd replicate the formulas in Columns L and M for each aging bucket, adjusting the date ranges accordingly. A template like the Accounts Receivable Tracker is pre-built with this functionality.
Conditional Formatting for Visual Cues
To make your tracker even more effective, use conditional formatting. This allows you to highlight rows or cells based on specific criteria.
- Overdue Invoices: Select your entire data range (e.g., A2:J100). Go to "Conditional Formatting" > "New Rule" > "Use a formula to determine which cells to format." Enter the formula:
= $I2="Overdue"(assuming your Status column is I and your data starts on row 2). Choose a light red fill. - Almost Due Invoices: For invoices due within the next 7 days, use a formula like:
=AND($I2="Open", $E2<=TODAY()+7). Apply a yellow fill. - Fully Paid Invoices: To visually gray out paid invoices, use:
= $I2="Paid". Apply a light gray font color and fill.
This visual system immediately draws your attention to the invoices that need action, saving you from sifting through every line item.
Common Mistakes to Avoid
- Inconsistent Data Entry: Not using the same format for dates, not entering invoice numbers correctly, or misspelling customer names will break formulas and make sorting impossible.
- Ignoring the "Amount Paid" Column: This is the most common oversight. If you don't diligently update how much has been paid, your
Balance Duewill always be wrong. - Not Reconciling Regularly: Periodically compare your tracker to your bank statements and accounting software to ensure everything matches. Discrepancies can indicate missed payments or data entry errors.
- Over-Reliance on Manual Status Updates: Using formulas for the "Status" column, as shown above, reduces human error and ensures consistency. Manually typing "Open," "Paid," or "Overdue" is prone to mistakes.
- Lack of Follow-Up Process: Having a tracker is only half the battle. You need a defined process for when invoices become overdue. Who contacts the client? What's the escalation path?
Frequently Asked Questions
Can I track partial payments with this?
Yes, you can. In the Amount Paid column, enter the cumulative amount received so far. The Balance Due formula (=Invoice Amount - Amount Paid) will automatically update to reflect the remaining balance. You might also want to adjust the Status formula to include a "Partially Paid" status if Amount Paid is greater than 0 but less than Invoice Amount.
How do I handle credit memos or refunds?
For credit memos, you can create a separate column, perhaps named "Credit Memo Amount," and then adjust your Balance Due formula to account for it. A common approach is Balance Due = Invoice Amount - Amount Paid - Credit Memo Amount. Alternatively, you can issue a negative "invoice" for the credit memo and apply it against an existing invoice. The Client Balance Tracker can help manage these complex client accounts.
What if I have many different payment terms?
Your Invoice Amount and Due Date columns handle this. When you enter an invoice, simply calculate the Due Date based on the specific payment terms (e.g., Net 30, Net 60) for that customer or invoice. You could add an optional "Payment Terms" column to your tracker for reference. Analyzing these terms can be important, which is where a tool like the Credit Terms Analysis for Accounts Receivable might be useful.
Is there a template that integrates invoicing and tracking?
While a standalone accounts receivable tracker is powerful, many accounting software solutions offer integrated invoicing and tracking. For spreadsheet users, you might look for templates that combine invoice generation with tracking, or use separate templates for invoicing and then import the data into your main AR tracker. The library offers various options for managing client accounts, such as the Client Balance Tracker. You can download any of these templates for a one-time fee of $9, granting unlimited access.