Create your petty cash log in Excel in under an hour
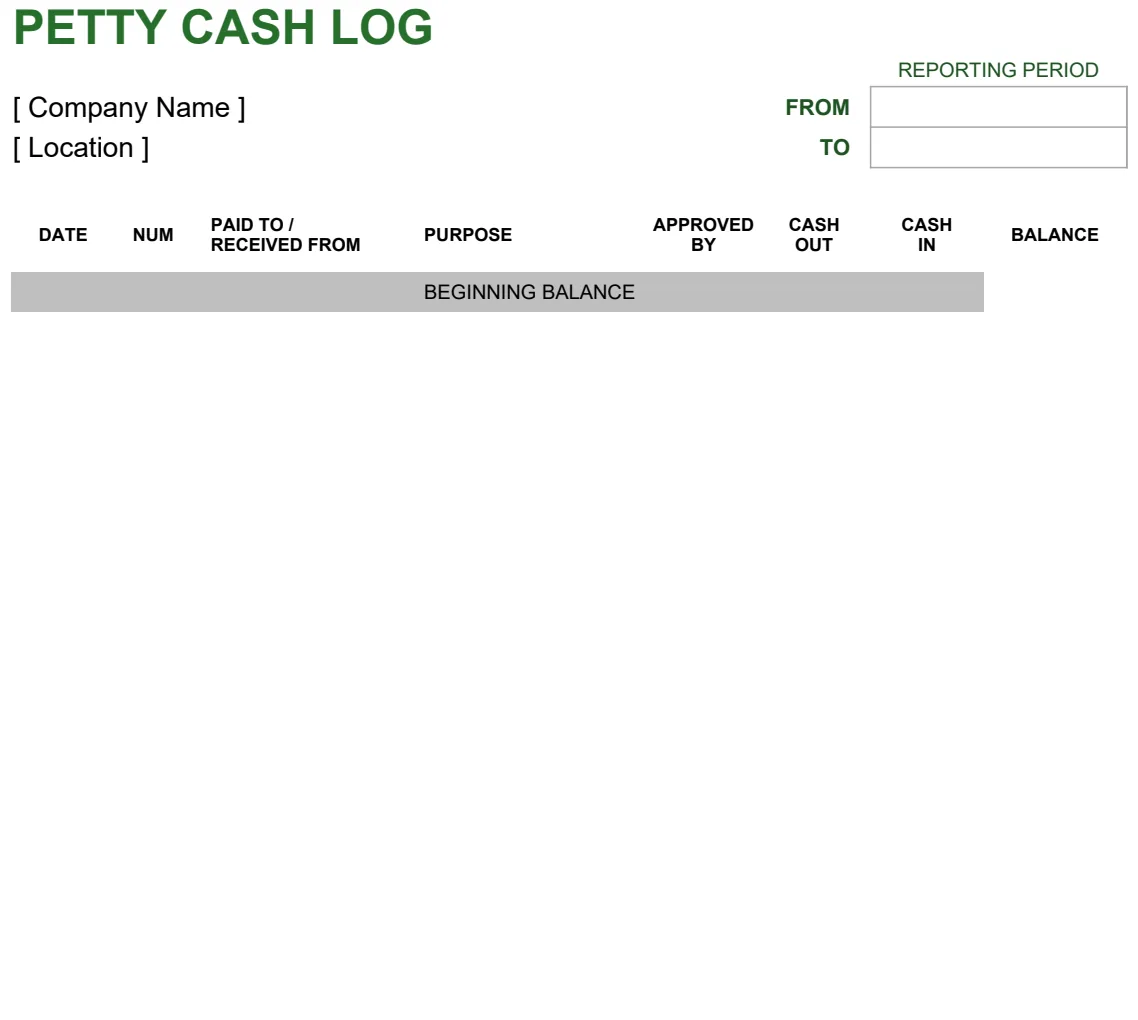
Create a clear, consistent petty cash log in Excel to prevent reconciliation headaches and capture essential transaction details easily.
The most critical element of a functional petty cash log is a clear, consistent structure for recording transactions. Most people struggle by either over-complicating the entry process or not leaving enough room for essential details, which leads to reconciliation headaches. A well-designed petty cash log template Excel document can prevent these issues by guiding you through each transaction with pre-defined fields and built-in calculations.
This isn't just about having a place to write things down; it's about creating a system that works. A good template ensures you capture information like the date, the amount spent, who approved it, and the purpose of the expense, all in a way that makes sense later. Without this, tracking where small amounts of cash have gone can quickly become an impossible task, especially when you need to reconcile the fund.
Essential Columns for Your Petty Cash Log
To effectively manage your petty cash, your log needs specific columns. These aren't arbitrary; each serves a purpose in tracking the flow of money and ensuring accountability.
- Date: The date the transaction occurred. This is crucial for chronological tracking and for pinpointing when specific expenses were incurred.
- Description/Purpose: A brief but clear explanation of what the cash was used for. Vague entries like "Supplies" are unhelpful. Be specific, e.g., "Office supplies - pens and paper," or "Client lunch meeting."
- Amount Paid Out: The exact amount of cash disbursed for the expense. This is a direct deduction from your available cash.
- Receipt Number/Reference: If a receipt is provided, note its number. This acts as a cross-reference for verification. If no receipt is available, you might note "No Receipt" or a specific internal reference.
- Received By/Employee Name: The name of the person who received the cash or made the purchase. This establishes responsibility.
- Approved By: The name or initials of the person who authorized the expenditure. This adds another layer of control.
- Balance: This is a running total. After each disbursement, you calculate the remaining cash. This column is often automated in a good template.
Setting Up Your Template
When you're looking for a petty cash log template Excel file, you want one that already has these columns laid out logically. If you're building your own, start by creating these headers in the first row of your spreadsheet.
Here’s a step-by-step to get started:
- 01Open a New Spreadsheet: Start with a blank workbook in Excel or Google Sheets.
- 02Enter Column Headers: In row 1, type the essential column names: "Date", "Description", "Amount Paid Out", "Receipt #", "Received By", "Approved By", and "Balance".
- 03Format Dates: Select the "Date" column, right-click, and choose "Format Cells." Select "Date" and pick a format you prefer (e.g., MM/DD/YYYY).
- 04Format Currency: Select the "Amount Paid Out" and "Balance" columns. Right-click, choose "Format Cells," and select "Currency" or "Accounting." Ensure the correct currency symbol is displayed.
- 05Set Up the Balance Formula: This is where the magic happens.
- In the first cell of your "Balance" column (let's say G2, assuming your data starts in row 2 and "Amount Paid Out" is column C), you'll enter your starting cash amount. If you start with $200, you'd type
=$200or simply200. - In the next cell down (G3), you'll enter the formula to calculate the running balance. Assuming your previous balance is in G2 and the current "Amount Paid Out" is in C3, the formula would be
=G2-C3. - Important Edge Case: What if there's no disbursement on a given row? You don't want the balance to show a negative number or an error. You can use an
IFstatement. So, in G3, you might have=IF(C3<>"", G2-C3, G2). This checks if there's an amount in C3; if so, it subtracts it from the previous balance (G2). If C3 is empty, it just carries over the previous balance (G2). - Drag this formula down to apply it to all subsequent rows.
- 06Add Initial Cash: In the first row where you enter data (row 2), the "Amount Paid Out" column (C2) should be blank. The "Balance" column (G2) should reflect your starting cash amount. You might add a note in the "Description" column like "Starting Cash."
This setup provides a clear audit trail and instant visibility into your available petty cash. For more advanced tracking, a template like the Petty Cash Log can offer pre-built formulas for these exact scenarios, saving you setup time.
Reconciling Your Petty Cash
Reconciliation is the process of comparing your log entries against the actual cash on hand. This should happen regularly, ideally weekly or bi-weekly, depending on your transaction volume.
The process is straightforward:
- 01Count the Cash: Physically count all the bills and coins remaining in the petty cash box.
- 02Sum the Disbursements: Add up all the amounts listed in your "Amount Paid Out" column for the period you are reconciling.
- 03Calculate Expected Balance: Take your starting cash amount for the period and subtract the total disbursements.
- 04Compare: Compare the physical cash count to your calculated expected balance.
If the numbers match, your log is accurate. If they don't, you need to investigate. This is where having detailed descriptions and approved-by fields becomes invaluable.
Common Mistakes to Avoid
Even with a template, errors can creep in. Being aware of these pitfalls can save you a lot of trouble.
- Vague Descriptions: As mentioned, "Misc." or "Supplies" isn't enough. You need to know exactly what was purchased. This is critical for expense categorization and auditing.
- Forgetting to Record a Transaction: This is the most common cause of an unbalanced fund. Even tiny cash payments must be logged immediately.
- Not Getting Signatures/Approvals: This undermines accountability. If an expense isn't authorized, it's harder to justify.
- Using the Petty Cash Fund for Too Much: Petty cash is for minor, incidental expenses. Large purchases should go through standard invoicing and payment processes. A general rule of thumb is that individual disbursements shouldn't exceed $50-$100, depending on your organization's policy.
- Not Reconciling Regularly: Waiting too long to reconcile makes it exponentially harder to find discrepancies. The longer you wait, the more transactions obscure the issue.
- Mixing Personal and Business Funds: Never use personal cash to top up the petty cash fund, or vice-versa. Keep them strictly separate.
Advanced Features and Templates
While a basic spreadsheet is functional, more advanced templates can automate tasks and add layers of control. Features to look for include:
- Automatic Running Balance: This is essential. A good template will update the balance automatically as you enter new expenses.
- Date Range Summaries: The ability to quickly see total expenses within a specific week, month, or quarter.
- Categorization: Some templates allow you to assign categories to expenses (e.g., "Office Supplies," "Postage," "Travel"). This helps with budgeting and analysis.
- Chart of Accounts Integration: For businesses, a more sophisticated template might tie petty cash expenses back to your general ledger's chart of accounts. The Petty Cash Template V13 is an example that includes this kind of integration.
These features turn a simple log into a powerful financial management tool. You can find pre-built solutions, like the Petty Cash Log, that incorporate these functionalities, often with clear instructions on how to use them.
Frequently Asked Questions
How do I handle reimbursements with a petty cash log?
If an employee uses personal funds for a business expense and needs to be reimbursed from petty cash, you would record this as a "payment out." The "Description" would clearly state "Reimbursement for [Employee Name] - [Purpose of Expense]," and the "Received By" would be the employee receiving the cash. Ensure proper documentation (like a receipt from the original purchase) is attached to the log entry.
What if I need to replenish the petty cash fund?
When the cash on hand gets low, you'll need to replenish it. This involves a formal process, often requiring a check request. The total amount of your disbursements for the period, plus the remaining cash on hand, should equal your original starting balance. For example, if you started with $200, have $50 left, you'll need a $150 replenishment. This replenishment transaction itself is usually recorded as a journal entry in your accounting system, not directly on the petty cash log, but it clears out the recorded expenses and resets your cash balance to the original amount.
Can I use a simple notebook instead of a spreadsheet for my petty cash log?
While a notebook can work for very small, infrequent transactions, it lacks the automation and analytical capabilities of a spreadsheet. Formulas for running balances, date filtering, and summing expenses are difficult to manage manually. A spreadsheet, especially a well-designed petty cash log template Excel file, provides accuracy, efficiency, and better reporting. For any business that processes more than a handful of small transactions a week, a digital solution is highly recommended.
How often should I balance and reconcile my petty cash?
It's best practice to reconcile your petty cash fund at least once a week, or more often if your transaction volume is high. Daily reconciliation is ideal for maximum control, but weekly is generally sufficient for most small businesses. The key is consistency. Regular reconciliation catches errors early, prevents discrepancies from snowballing, and ensures the fund remains auditable.